1.IOC
1.1 IOC
Spring Boot 的 IOC(Inversion of Control,控制反转)是 Spring 框架的核心特性之一,旨在降低代码之间的耦合度,提高系统的可维护性和可扩展性。在 Spring Boot 中,IOC 的主要实现方式是依赖注入(Dependency Injection,DI)。
控制反转(IOC)
控制反转是一种设计原则,其核心思想是:将原本由代码直接操控的对象的调用权交给第三方(例如一个容器)来控制,以解耦代码,提高程序的可扩展性和可维护性。
依赖注入(DI)
依赖注入是实现控制反转的一种手段。在 Spring Boot 中,你可以通过构造器、Setter 方法或字段注入的方式,将依赖的对象注入到需要它的类中。这样,你就可以在运行时动态地改变对象之间的依赖关系,而不需要修改源代码。
1.2 示例
数据库连接信息:
package org.example;
import lombok.Data;

@Data
public class DataConfig {
    private String host;
    private String port;
    private String username;
    private String password;
}
1.2.1 配置文件
配置文件:
<?xml version="1.0" encoding="UTF-8"?>
<beans xmlns="http://www.springframework.org/schema/beans"
       xmlns:xsi="http://www.w3.org/2001/XMLSchema-instance"
       xmlns:p="http://www.springframework.org/schema/p"
       xmlns:util="http://www.springframework.org/schema/util"
       xmlns:context="http://www.springframework.org/schema/context"
       xmlns:aop="http://www.springframework.org/schema/aop"
       xsi:schemaLocation="http://www.springframework.org/schema/beans http://www.springframework.org/schema/beans/spring-beans.xsd
                        http://www.springframework.org/schema/util
                        http://www.springframework.org/schema/util/spring-util-4.0.xsd http://www.springframework.org/schema/context https://www.springframework.org/schema/context/spring-context.xsd http://www.springframework.org/schema/aop https://www.springframework.org/schema/aop/spring-aop.xsd"
>

    <bean class="org.example.DataConfig" id="dataConfig">
        <property name="host" value="localhost"/>
        <property name="username" value="root"/>
        <property name="password" value="root"/>
        <property name="port" value="3306"/>

    </bean>
</beans>
配置IOC容器:
//读取xml配置文件配置IOC容器
ApplicationContext xmlcontext=new ClassPathXmlApplicationContext("spring.xml");
DataConfig xmldataConfig = (DataConfig) context.getBean("dataConfig");
System.out.println(xmldataConfig.getHost());
1.2.2 配置类
新建Bean配置类:
package org.example;

import org.springframework.context.annotation.Bean;
import org.springframework.context.annotation.Configuration;

@Configuration
public class BeanConfiguration {

    //设置参数:@Bean(name = "config")
    @Bean
    public DataConfig dataConfig(){
        DataConfig dataConfig = new DataConfig();
        dataConfig.setHost("localhost");
        dataConfig.setPort("3306");
        dataConfig.setUsername("root");
        dataConfig.setPassword("root");
        return dataConfig;
    }
}
格局配置类创建IOC容器:
//读取配置类配置IOC容器
ApplicationContext context = new AnnotationConfigApplicationContext(BeanConfiguration.class);
DataConfig dataConfig = context.getBean(DataConfig.class);
System.out.println(dataConfig.getHost());
读取配置包导入IOC容器:
//读取配置包配置IOC容器
ApplicationContext ctx=new AnnotationConfigApplicationContext("org.example.config");
DataConfig dataConfig1 = ctx.getBean(DataConfig.class);
System.out.println(dataConfig1.getHost());
1.2.3 扫包+注解
扫包,如把DataConfig类放入包:"org.example.dataconfig":
ApplicationContext context = new AnnotationConfigApplicationContext("org.example.dataconfig");
DataConfig dataConfig = context.getBean(DataConfig.class);
System.out.println(dataConfig.getHost());注解,对DataConfig类添加@Component注解,使用@Value设置值:
package org.example.dataconfig;

import lombok.Data;
import org.springframework.stereotype.Component;
import org.springframework.beans.factory.annotation.Value;

@Data
@Component
public class DataConfig {
    @Value("localhost")
    private String host;
    @Value("3306")
    private String port;
    @Value("root")
    private String username;
    @Value("root")
    private String password;
}
1.3 依赖注入:自动装配
使用:
ApplicationContext context = new AnnotationConfigApplicationContext("org.example.dataconfig");
GlobalConfig config= context.getBean(GlobalConfig.class);
System.out.println(config);
新建GLobalConfig类,对于DataConfig使用@Autowired进行自动装载:
package org.example.dataconfig;

import lombok.Data;
import org.springframework.beans.factory.annotation.Autowired;
import org.springframework.beans.factory.annotation.Value;
import org.springframework.stereotype.Component;

@Data
@Component
public class GlobalConfig {
    @Value("/home/user/data")
    private String path;
    @Autowired
    private DataConfig dataConfig;
}
2.AOP
2.1 AOP
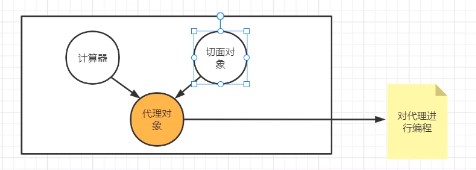
Spring Boot AOP(Aspect-Oriented Programming,面向切面编程)是 Spring 框架的一个关键组件,它允许开发者定义横切关注点(cross-cutting concerns),并将这些关注点与业务逻辑代码分离。横切关注点通常包括日志记录、事务管理、安全性、性能监控等,这些功能通常会跨越多个类和方法,如果直接在业务逻辑代码中实现,会导致代码冗余和难以维护。
AOP 通过将关注点模块化到切面(Aspect)中,并将切面与业务逻辑代码通过连接点(Join Point)进行关联,从而实现了关注点与业务逻辑的解耦。
在 Spring Boot 中,AOP 的实现主要依赖于 Spring AOP 和 AspectJ。Spring AOP 是 Spring 框架自带的 AOP 实现,它基于代理模式;而 AspectJ 是一个独立的 AOP 框架,提供了更强大和灵活的 AOP 功能。Spring Boot 可以与 AspectJ 集成,以支持更复杂的 AOP 需求。
2.2 示例
2.2.1 使用
计算加减:
package org.example.ioc;

import org.springframework.stereotype.Component;

@Component
public class Calc {

    public int add(int a, int b) {
        return a + b;
    }

    public int subtract(int a, int b) {
        return a - b;
    }
}
配置文件:
<?xml version="1.0" encoding="UTF-8"?>
<beans xmlns="http://www.springframework.org/schema/beans"
       xmlns:xsi="http://www.w3.org/2001/XMLSchema-instance"
       xmlns:p="http://www.springframework.org/schema/p"
       xmlns:util="http://www.springframework.org/schema/util"
       xmlns:context="http://www.springframework.org/schema/context"
       xmlns:aop="http://www.springframework.org/schema/aop"
       xsi:schemaLocation="http://www.springframework.org/schema/beans http://www.springframework.org/schema/beans/spring-beans.xsd
                        http://www.springframework.org/schema/util
                        http://www.springframework.org/schema/util/spring-util-4.0.xsd http://www.springframework.org/schema/context https://www.springframework.org/schema/context/spring-context.xsd http://www.springframework.org/schema/aop https://www.springframework.org/schema/aop/spring-aop.xsd"
>

<!--     自动扫包-->
        <context:component-scan base-package="org.example.ioc"/>

<!--        配置动态代理-->
        <aop:aspectj-autoproxy/>
</beans>
日志打印切面类:
package org.example.ioc;

import org.aspectj.lang.JoinPoint;
import org.aspectj.lang.annotation.After;
import org.aspectj.lang.annotation.AfterReturning;
import org.aspectj.lang.annotation.Aspect;
import org.aspectj.lang.annotation.Before;
import org.springframework.stereotype.Component;

@Aspect
@Component
public class Logger {

    @Before("execution(* org.example.ioc.Calc.*(..))")
    public void logBefore(JoinPoint joinPoint) {
        String methodName = joinPoint.getSignature().getName();
        System.out.println("Before method execution: " + methodName+"  params:"+joinPoint.getArgs()[0]+"  "+joinPoint.getArgs()[1]);
    }

    @AfterReturning(pointcut = "execution(* org.example.ioc.Calc.*(..))", returning = "result")
    public void logAfter(JoinPoint joinPoint,Object result) {
        System.out.println("After method executio: "+joinPoint.getSignature().getName()+"  result:"+result);
    }

}
使用:
ApplicationContext iocontext = new ClassPathXmlApplicationContext("aop.xml");
Calc calc = iocontext.getBean(Calc.class);
System.out.println(calc.add(1,2));
结果:
Before method execution: add  params:1  2
After method executio: add  result:3
3
2.2.2 SpringBoot项目日志
package com.example.videoplay.utils;

import com.example.videoplay.service.LogService;
import jakarta.servlet.http.HttpServletRequest;
import org.aspectj.lang.JoinPoint;
import org.aspectj.lang.annotation.Aspect;
import org.aspectj.lang.annotation.Before;
import org.springframework.beans.factory.annotation.Autowired;
import org.springframework.scheduling.annotation.EnableAsync;
import org.springframework.stereotype.Component;

import java.util.HashMap;
import java.util.Map;

@Component
@EnableAsync
@Aspect
public class LoggerAspect {

    @Autowired
    private LogService logService;

    @Before("execution(* com.example.videoplay.controller.VideoController.delayVideo(..))" +
            " || execution(* com.example.videoplay.controller.VideoController.getVideoList(..)) ")
    public void videoBefore(JoinPoint joinpoint) {
        HttpServletRequest request=(HttpServletRequest)joinpoint.getArgs()[0];
        String method=joinpoint.getSignature().getName(); //函数名称
        try {
            Map<String, String> map = (Map<String, String>) joinpoint.getArgs()[1];
            String ipaddress = map.get("ip") == null ? request.getRemoteAddr() : map.get("ip"); //ip地址
            insertLog(Integer.valueOf(map.get("userId")), map.toString(), method, ipaddress);
        }catch (Exception e) {
            System.out.println("video log failed");
        }
    }

    @Before("execution(* com.example.videoplay.controller.VideoController.getVideo(..)) " +
            "|| execution(* com.example.videoplay.controller.VideoController.getM3U8Content(..))")
    public void playVideoBefore(JoinPoint joinpoint) {
        HttpServletRequest request=(HttpServletRequest)joinpoint.getArgs()[0];
        String method=joinpoint.getSignature().getName();
        Map<String,String> map=new HashMap<>();
        map.put("filename",request.getParameter("filename"));
        map.put("id",request.getParameter("id"));
        map.put("token",request.getParameter("token"));
        map.put("ip",request.getParameter("ip"));
        String ipaddress=map.get("ip")==null?request.getRemoteAddr():map.get("ip"); //ip地址
        String token=map.get("token");
        try {
            Map<String, Object> tokenMap= JwtUtils.verifyJWT(token);
            insertLog((int) tokenMap.get("id"),map.toString(),method,ipaddress);
        }catch (Exception e) {
            System.out.println("token verify failed");
        }
    }

    @Before("execution(* com.example.videoplay.controller.UserController.login(..)) " +
            "|| execution(* com.example.videoplay.controller.UserController.register(..)) " +
            "|| execution(* com.example.videoplay.controller.UserController.updateUserInfo(..))")
    public void userLoginBefore(JoinPoint joinpoint) {
        HttpServletRequest request= (HttpServletRequest) joinpoint.getArgs()[0];
        String method=joinpoint.getSignature().getName();
        try{
            Map<String,String> map= (Map<String, String>) joinpoint.getArgs()[1];
            String ipaddress=map.get("ip")==null?request.getRemoteAddr():map.get("ip"); //ip地址
            insertLog(-1,map.toString(),method,ipaddress);
        }catch (Exception e) {
            System.out.println("user login failed");
        }

    }

    private void insertLog(int userId, String paramsMap, String method, String ip) {
        try {
            int res=logService.insertLog(userId,paramsMap,method,ip);
            if(res==0){
                System.out.println("insert log failed");
            }
        }catch (Exception e){
            System.out.println("insert log failed");
            e.printStackTrace();
        }
    }

}